
Emailing
The Emailing section is the store’s system for communicating with customers by email. It has three tools:
- NewsLetter design: you design and send newsletters.
- Emailing List: the addresses that receive newsletters.
- Email Templates: the texts of the automatic emails the store sends.
NewsLetter design
A newsletter designer that needs no special knowledge: you build the newsletter from blocks (rows), see it as the recipient will see it and send it from the same section.
The library
The page opens with a library of cards, one for each newsletter, with a thumbnail, name and date. The newest are first and at the very top it states how many there are. Each card has three buttons:
- Edit: opens the newsletter in the designer.
- Send: opens the sending screen (it appears when the newsletter has been saved and is ready).
- Bin: deletes the newsletter (confirmation is requested).
The first card with the + starts a new newsletter. No ready-made file is needed: a new newsletter is not written anywhere until you press Save.
The designer
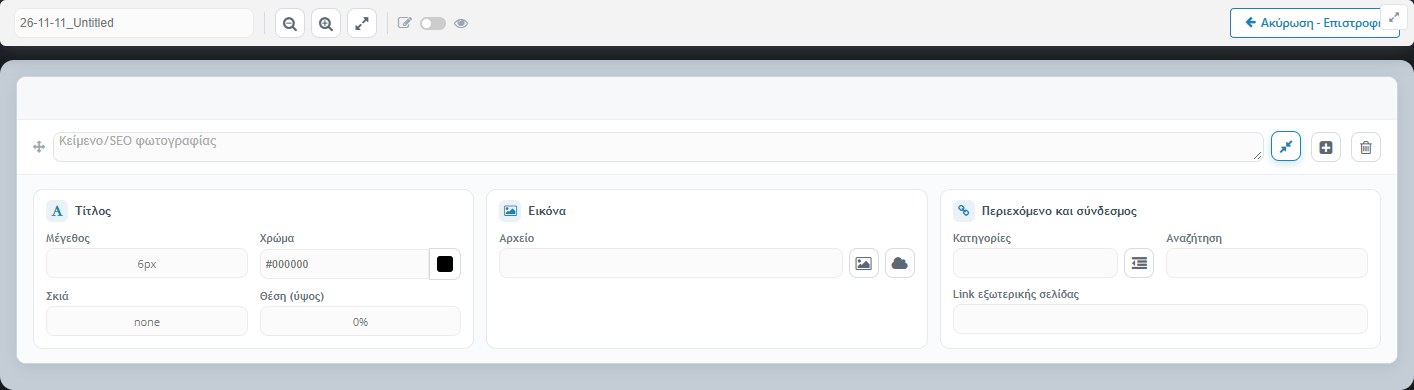
Each block is a card with a preview at the top, its title and buttons at the side:
- Move: you drag the block (by the handle or the preview) to change the order.
- More: opens the details of the block (below).
- Add: puts a new block right below this one.
- Delete: removes the block. The last block cannot be deleted, so the newsletter is never left empty.
The details of a block
The settings are divided into three groups.
- Text: letter size, colour (with a colour picker), shadow or outline of the letters and spacing above and below the title (as a percentage). A block without an image is displayed as a text banner.
- Image: the image file. You upload it from your computer (image button) or choose one you have already uploaded to the newsletter (cloud button). When there is an image, the block is displayed as a full-width image with the title as alternative text.
- Content / link: where the click leads.
- Categories and Search: the click opens the store’s product list for the categories you chose and, optionally, with a search word.
- External link: if you fill in an address, the block leads there and the categories are ignored.
Click statistics: the links to the store include the name of the newsletter, so that clicks are recorded per newsletter.
The top bar
- File name, with Rename and Delete buttons when the newsletter is already saved.
- Zoom in / out of the image and expanding all details at once.
- Design ↔ Preview switch: you see the whole newsletter as it will reach the recipient.
- Back to the library, Send and Save.
Saving keeps the design so you can edit it again and prepares the ready email, together with a plain-text version and a thumbnail for the library. There is no undo for deletion.
Sending
Send opens the sending screen with a preview of the newsletter and a top bar with all the options:
- Test: you write a test email, save it with the disk button and press the paper icon so the newsletter reaches you before you send it to everyone. Always test first.
- Recipients: “All” (shows the total, e.g. “1200 (900 + 300)”, i.e. newsletter list + users with consent) or Selection, where you choose specific recipients from a list with groups (newsletter list, users, B2B) and search.
- Send: before anything goes out, confirmation is requested with the number of recipients.
The store sends the emails one by one, with a short delay between them (set in the settings), so that it is not considered spam. The progress page refreshes by itself and shows how many have been sent (count, percentage and bar). Keep the window open until it finishes.
- Pause and resume: if sending is interrupted (e.g. you closed the window), the store remembers how many have been sent. When you return to the sending screen you see the Counter and the Continue button, which continues with the same recipients from where it stopped.
- Change Counter / Reset: you correct the number already sent or start from the beginning.
- Message title: “Newsletter – store title and date”. At the end of each email a footer is added automatically with a link to unsubscribe from the list and the personal data protection details.
Sending uses the newsletter email account that has been set in the store’s settings. If it is not set up correctly, the emails do not go out and an error message appears with the address.
Emailing List

Here you see who the store sends newsletters to. The top bar has four tabs with a counter, which change the list you see:
- All order emails: the addresses of those who have ordered (view only).
- Saved emails with consent: the newsletter list (this is the default).
- User emails: users who gave consent and are not already in the list.
- Total to send: the newsletter list together with the users, i.e. those who will receive the next newsletter.
Each row shows the number, the email, the name (from the user or the order) and an origin icon (order, newsletter or user).
Actions
You find them in the menu of the selection box in the header:
- Add: opens a window where you write a new address and add it to the list.
- Delete duplicates: removes repeated addresses.
- Multiple delete: deletes the rows you ticked in the list you see, with confirmation and count.
- Delete a single row: with the bin, after confirmation. The confirmation message warns that the address’s coupon is also deleted, if there is one. Deleting a user only removes them from the newsletter recipients, it does not delete their account.
- Search: the search field (from 3 characters) searches the email and the name, in all tabs.
The browser remembers the tab you left open and opens it the next time.
Email Templates
The store sends emails automatically in many cases (order, cancellation, tracking code etc.). Here you define the text and the title of these messages, without changing code, for both languages of the store.
The email types
Each template belongs to one of 12 types:
- Form: Form Reply Notification
- Users: User Creation, Reset Password
- Appointments: Appointment Notification
- Orders: Send Order, Cancel Order, Return Order, Tracking Code
- Marketing: NewsLetter Subscription, Ratings Dispatch, Discount Voucher
- Personal data: GDPR Request Notification
The list
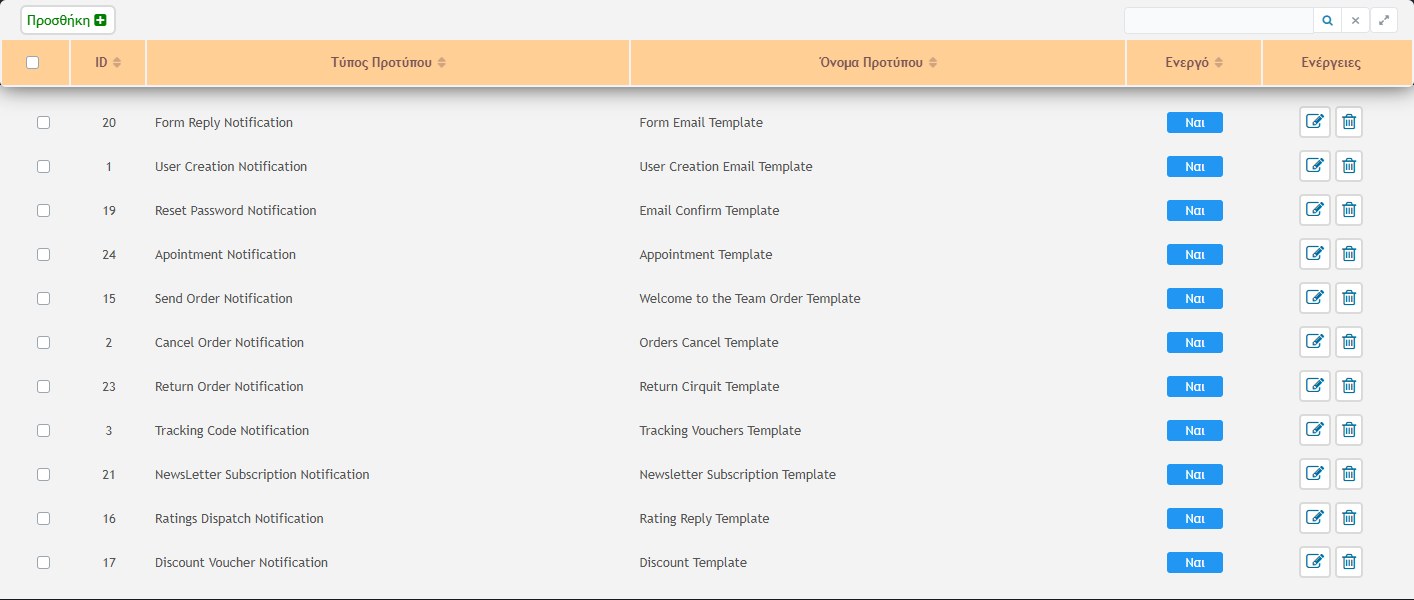
The table shows the ID, type, name, whether it is active (YES / NO) and buttons for editing and deleting. In the top bar you have Add and a live search in ID, type and name. You sort by clicking a column title and delete many at once with multiple delete from the selection box.
Editing
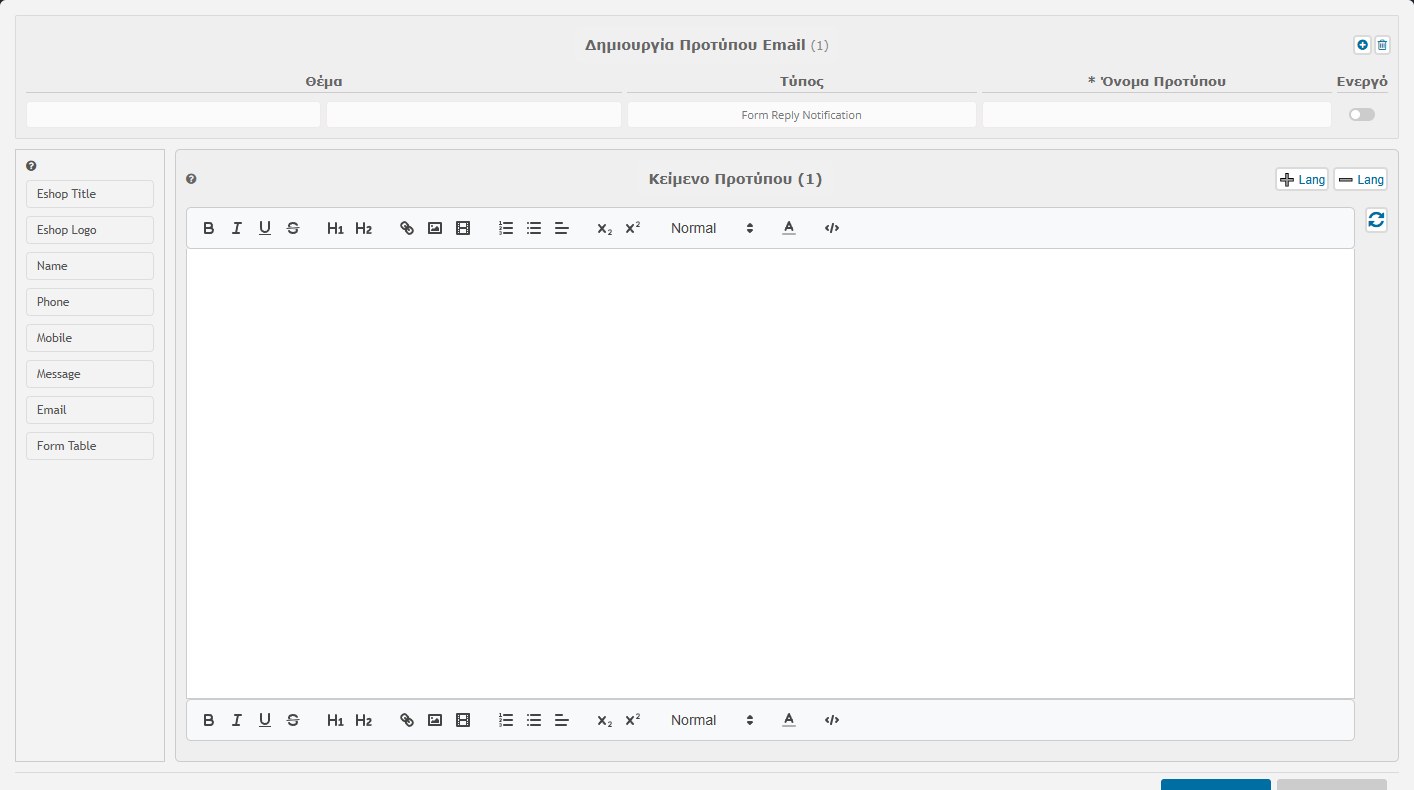
- Type: you choose when the email is sent.
- Name and Active: the name is required (Save stays inactive until you fill it in). The switch activates or deactivates the template.
- Subject: the title of the email, in Greek and English.
- Text: the editor has two tabs (Greek / English). At the side there is a panel with the fields that fit the type (e.g. in the order: number, date, total, payment method, product list, and in all: the store’s title and logo). You drag them into the text and they are replaced automatically with the real data every time the email is sent.
- Save or Cancel.
Which template is used: for each type the active template with the largest ID (the most recent) counts. To change the message, edit the existing one or create a new active one. The language of the message depends on the customer’s language.