
Bulk Imports
Bulk Imports is the tool for passing many products at once from the file (Excel XLS / XLSX or CSV) that your supplier or manufacturer sends you, without typing them one by one. The tool reads the file, matches its columns to the store’s fields and passes new products into the database or adds quantities to existing ones. You find it in the menu Import/Export → Bulk Imports.
AI tools: in the value lists (colours, categories, types, sizes) there is the AI matching button, which automatically suggests which store value each value in the file corresponds to. You save a lot of work, but check the suggestions before you save. They work when the connection to ChatGPT or Claude is active in the Platform Settings.
The flow has four steps: file upload, column matching, value lists and preview and import. For each manufacturer the matching is saved, so next time it doesn’t have to be done from scratch (Tool Setup).
In this article’s example a real supplier file was used (Adidas, 4 rows: one product in 4 sizes). We went as far as the preview and no import was made into the database. The supplier’s contact details are blurred.
Step 1: File upload and manufacturer selection
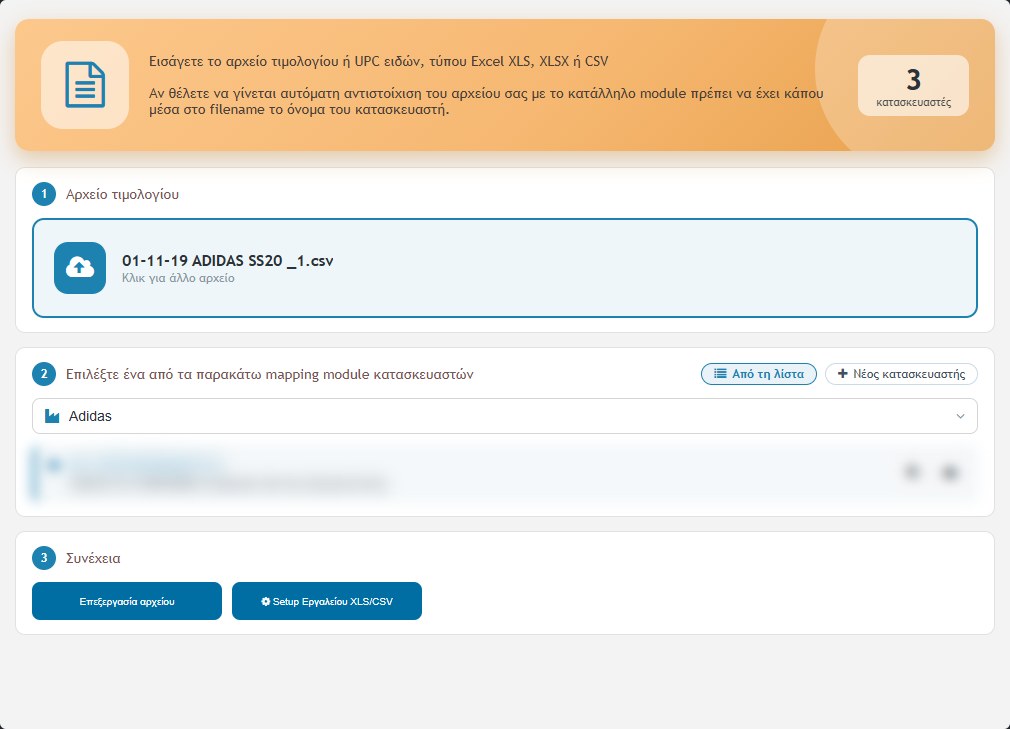
- Invoice file: drag the file into the box or click to choose it. .csv, .xls and .xlsx are supported.
- Manufacturer (mapping module): a module keeps the matching of one manufacturer. If the file name contains the manufacturer’s name (e.g. “ADIDAS” in “01-11-19 ADIDAS SS20 _1.csv”), the module is chosen by itself. Otherwise you choose it from the list. With New manufacturer you create a new module with a name of your own (at least 3 letters, and not an existing one).
- Manufacturer details: below the list the notes and email you have set for the manufacturer appear, with buttons for copying and sending an email (to ask the supplier for the file).
- Process file opens the matching screen. The XLS/CSV Tool Setup opens the modules.
Step 2: Column matching
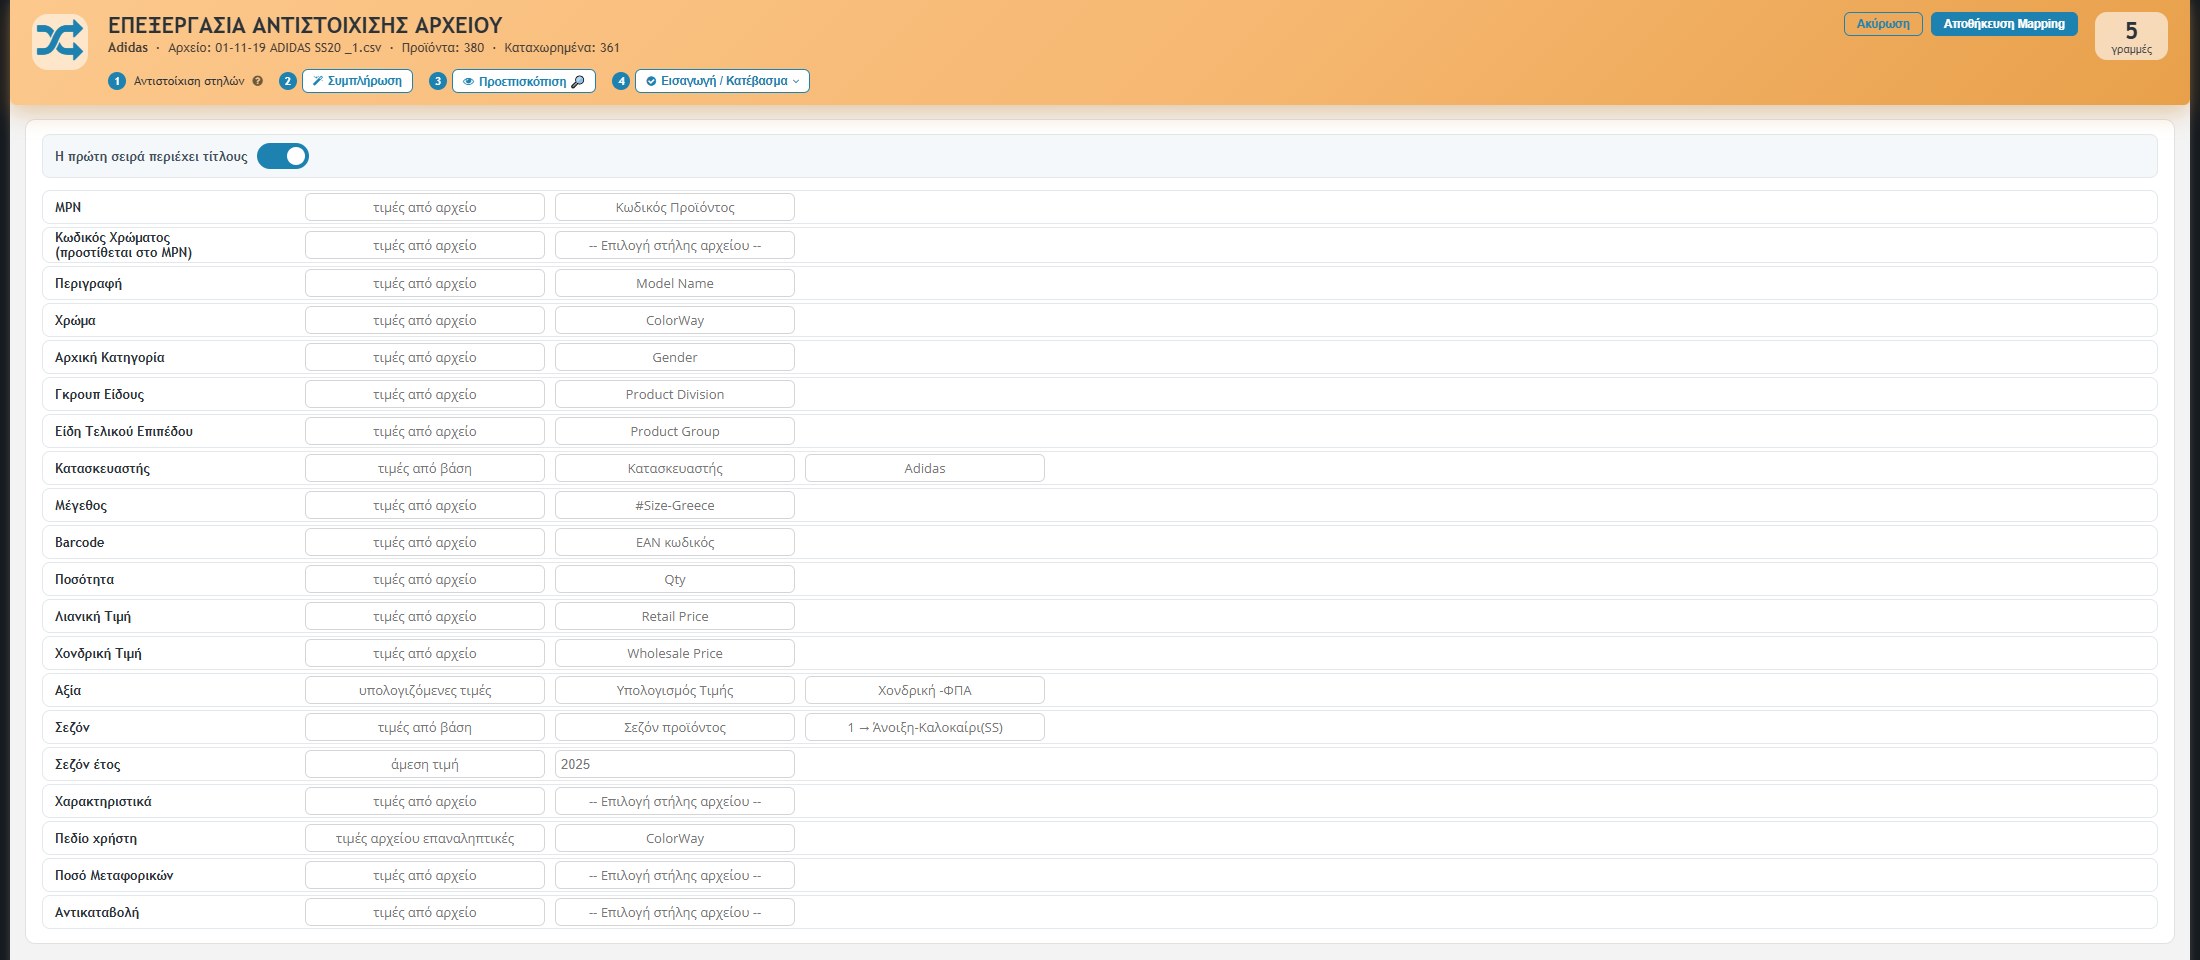
At the top the manufacturer, the file name, how many products and how many registered the store has, and on the right the number of rows in the file are written. The steps appear as numbered buttons: 1 Column matching, 2 Fill, 3 Preview, 4 Import / Download.
- The first row contains titles: the switch at the top. If it is on, the first row of the file is considered a header and its names appear in the column lists.
- Fill: fills in the matching automatically from what has been saved for the manufacturer. Fields that do not correspond to a column stay “– Select file column –”.
The store fields
Each row of the screen is a product field: MPN, Colour Code (added to the MPN), Description, Colour, Initial Category, Type Group, Final Level Types, Manufacturer, Size, Barcode, Quantity, Retail Price, Wholesale Price, Value, Season, Season year, Attributes, User field, Shipping Amount and Cash on Delivery.
For each field you choose where it takes its value from:
- values from file: takes values from a column of the file (you choose it in the adjacent field). The column is matched once.
- repeatable file values: the column can be used as many times as you want. This way products use the same value (e.g. the ColorWay) in more fields.
- values from database: takes ready values from the store’s lists. In the example the Manufacturer is “Adidas” and the Season is “Spring-Summer (SS)”.
- calculated values: the value is calculated with a formula, such as the Value that results from the wholesale price based on the module’s settings (Profit, VAT).
- direct value: a fixed value put in all rows (e.g. “Season year: 2025”).
The question mark next to “Column matching” explains these options.
Step 3: The manufacturer’s value lists
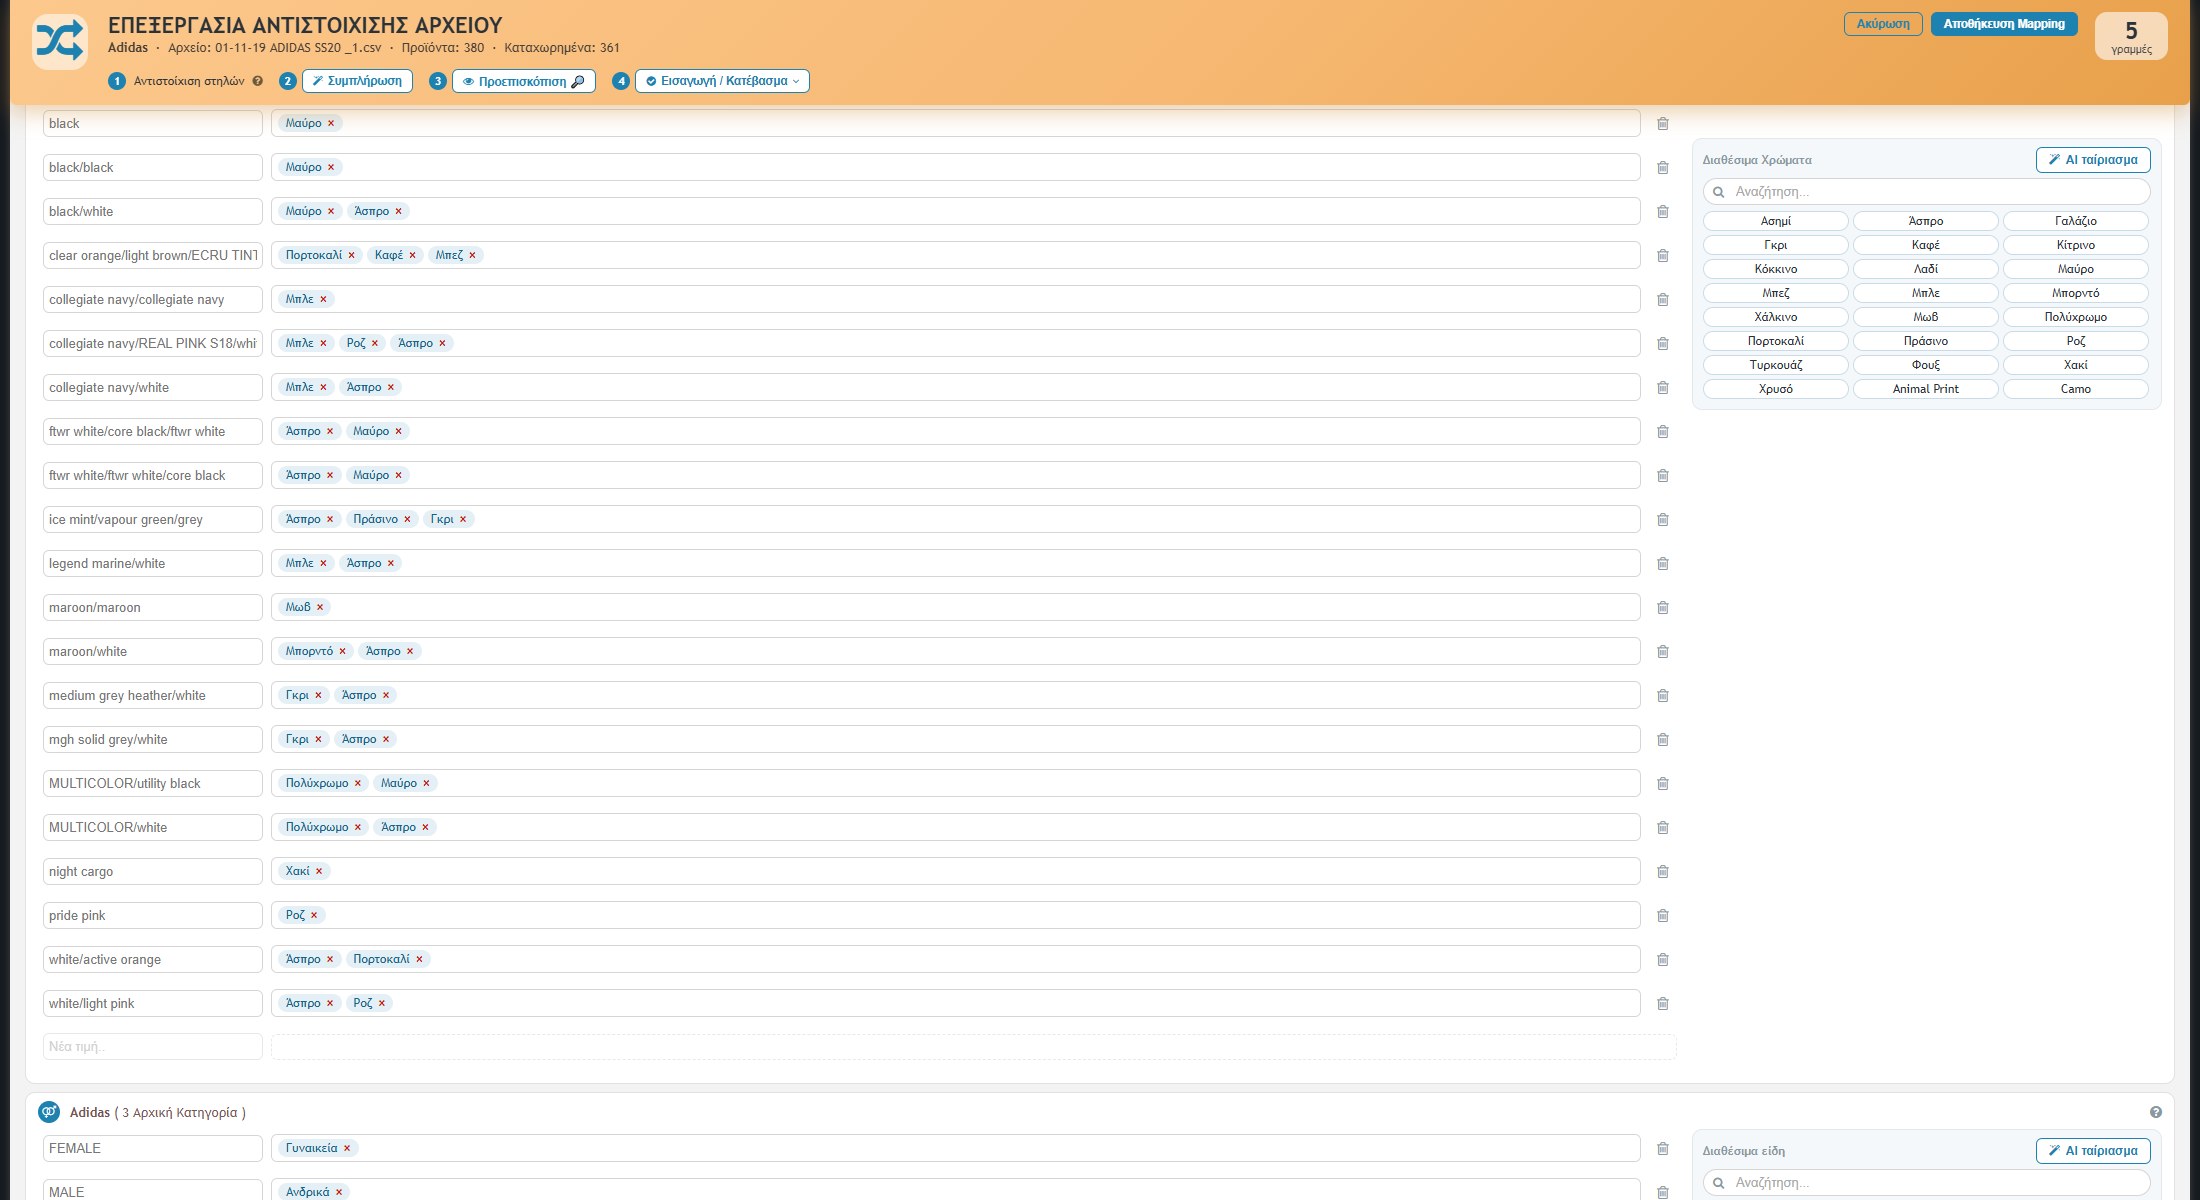
Below the matching there are five lists. In each one you write on the left what the supplier’s file says and on the right you choose what it means in your store:
- Colours: e.g. “collegiate navy/REAL PINK S18/white” → Blue, Pink, White. One text can correspond to several colours.
- Initial category: e.g. FEMALE → Women, MALE → Men, UNISEX → Men and Women.
- Type group (e.g. APPAREL → Clothing) and final level types (e.g. T-SHIRTS → Short-sleeve top).
- Sizes: e.g. “OSFT” → ONE SIZE. The Add selected button adds to the store’s size chart the sizes of the file that don’t already exist.
Each store value is clicked from the “Available…” box on the right, and there is also a search. AI tool: the AI matching button (top right in each list) automatically suggests matches and you check them. With the bin you delete a row and below there is always an empty “New value…” row for adding new ones. The lists are saved together with the matching.
Step 4: Preview and import

The Preview shows the table as it will pass into the store, with the values already translated from the lists (e.g. “collegiate navy/REAL PINK S18/white” became “Blue|Pink|White”). Check it before you continue: if something is wrong, go back to the matching or the lists.
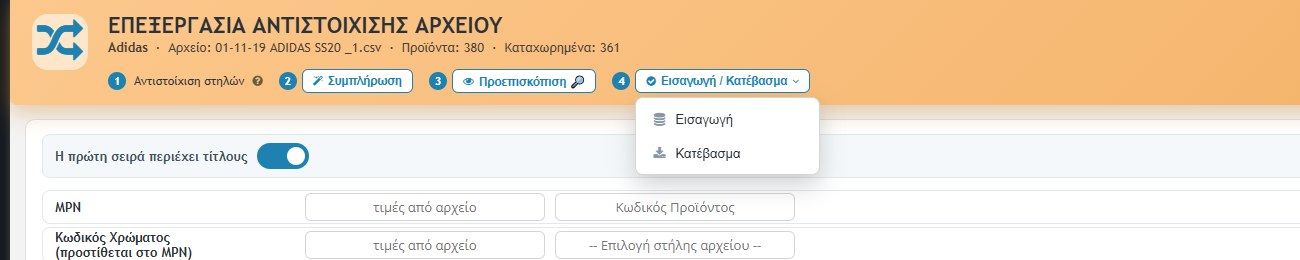
Step 4 has two options (also in the preview window):
- Import: passes the data into the eShop’s database. Before it happens, confirmation is requested with a warning: the warehouse cannot be restored to its original state after importing new codes or adding quantities to existing ones.
- Download: downloads the processed file in ASCII ERP format (CSV in Greek encoding), so you can pass it to an ERP without touching the store.
What the Import does
- Existing product: if the MPN already exists in the store, its barcodes, quantities and sizes are updated. Quantities are added to the storage location set for the manufacturer (in the Setup, otherwise the first).
- New product: if the MPN does not exist, a new product is created with the next ID, a description of the form “BRAND Description (MPN)”, and the other data from the matching (colour, categories, size, barcode, quantity, price, season, attributes, shipping etc.). It has no photos and text yet: you add them afterwards from the Products List.
- Categories: the “Initial Category > Group > Type” is searched in the store’s lists. The value “Men|Women” becomes two paths. If a value is not found, it stays as it is in the file.
- The action is recorded in the action Log (BULK IMPORT).
After the import the store is updated with the Product Store Updater (usually done automatically by the server).
At the end, the Save Mapping button saves the matching and the lists in the manufacturer’s module. Cancel closes the procedure and deletes the temporary file.
XLS/CSV Tool Setup

From the “XLS/CSV Tool Setup” button the table of modules opens. For each manufacturer you define:
- Module name: the manufacturer’s name. It must exist inside the file name, so that automatic matching happens.
- Notes and Email of the supplier.
- Profit and VAT: used in the calculated values.
- Import storage location: the store where quantities are added when products of this manufacturer are passed (it appears only if your installation has storage locations configured).
The column matching and the lists are not written here, but from “Save Mapping” on the matching screen. Below the table you see the automated email (subject and text) used by the send button of the first screen, to ask the supplier for the order’s XLS/UPC file.