
Main Settings
The Main Settings are the menu where the platform itself is set up and maintained: texts and translations, the action log, which tools appear in the menu, the modules, the dropdown lists and the general settings of the eShop. It has six pages and is usually used by the installation’s administrator, not by the stores’ staff.
AI tools: the Main Settings are where the AI tools are activated. In the Platform Setup you put the key (API key) of ChatGPT or Claude and turn on the AI switch. From then on the AI translations appear in the Translator and across the platform (AI descriptions, AI images, AI suggestion and AI matching on products). The translation languages are defined in the “AI” list of the Dropdown Lists.
Translator
All the wording of the platform (the texts the customer sees in the eShop and the texts of the management) are in one central list, the Translator. This way you change a word or a phrase in Greek and English in one place, and it changes everywhere. The page has about 2,800 strings.

Each row has:
- Variable: the name of the string that the code reads (e.g.
$config_dspl_piece), - Group: which section it belongs to (e.g. BE_Displayer, Front_End, FE_Cart),
- FE/BE: whether it appears in the eShop (FE) or in the management (BE),
- Description GR and Description EN: the text in the two languages,
- edit and delete buttons.
To find a string use the filters at the top: variable, group, FE/BE, and the search field (it also searches in the text). The Add button creates a new string and Cancel goes back without saving.

AI tools in the Translator: when the connection to ChatGPT or Claude is active, at the top the source and target language options appear (“Auto Detect → English”) and in each row the 🌐 AI translation button. You write the text in one language and the AI fills in the other. The languages are chosen from the “AI” list of the Dropdown Lists (e.g. English, Greek, Italiano, Deutsch, Français, Español).
User Logs
The Log records who did what and when in the platform: saves and data changes, deletions, imports, and actions that were not allowed.
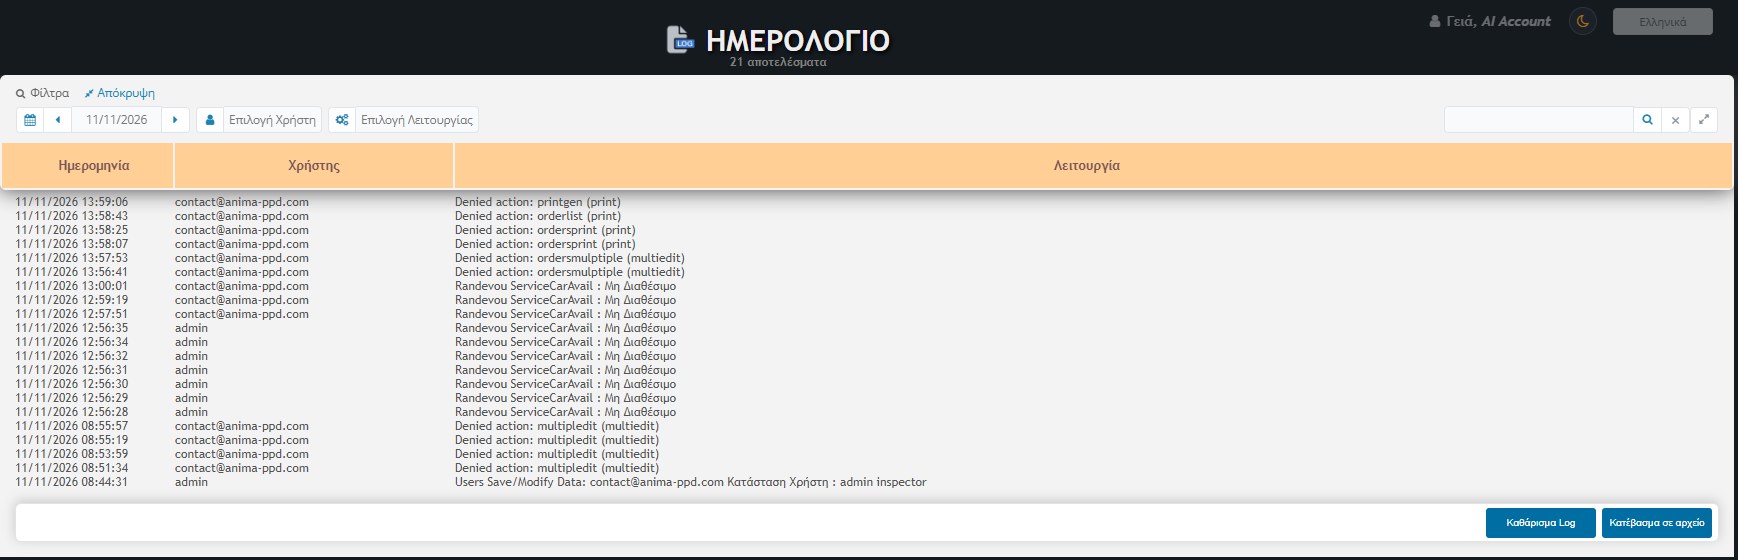
- Date: shows one day at a time. With the arrows you go to the previous or next day and with the calendar icon you choose a specific one.
- User Selection: you see only the actions of one user.
- Function Selection: you see only one type of action.
- Search at the top right for any word within the records.
- Clear Log: deletes the records.
- Download to file: downloads the log.
It is useful when you want to find who changed a price or to check why someone couldn’t perform an action (“Denied action”). Also look at the User column to see which account it was done with.
Tool Menu
The Tool Menu is the table that defines which tools appear in the left column of the management and in what order. Each row is a tool (e.g. Add Product, Inventory, Displayer). Here 73 rows appear, from the main tools and their submenus.
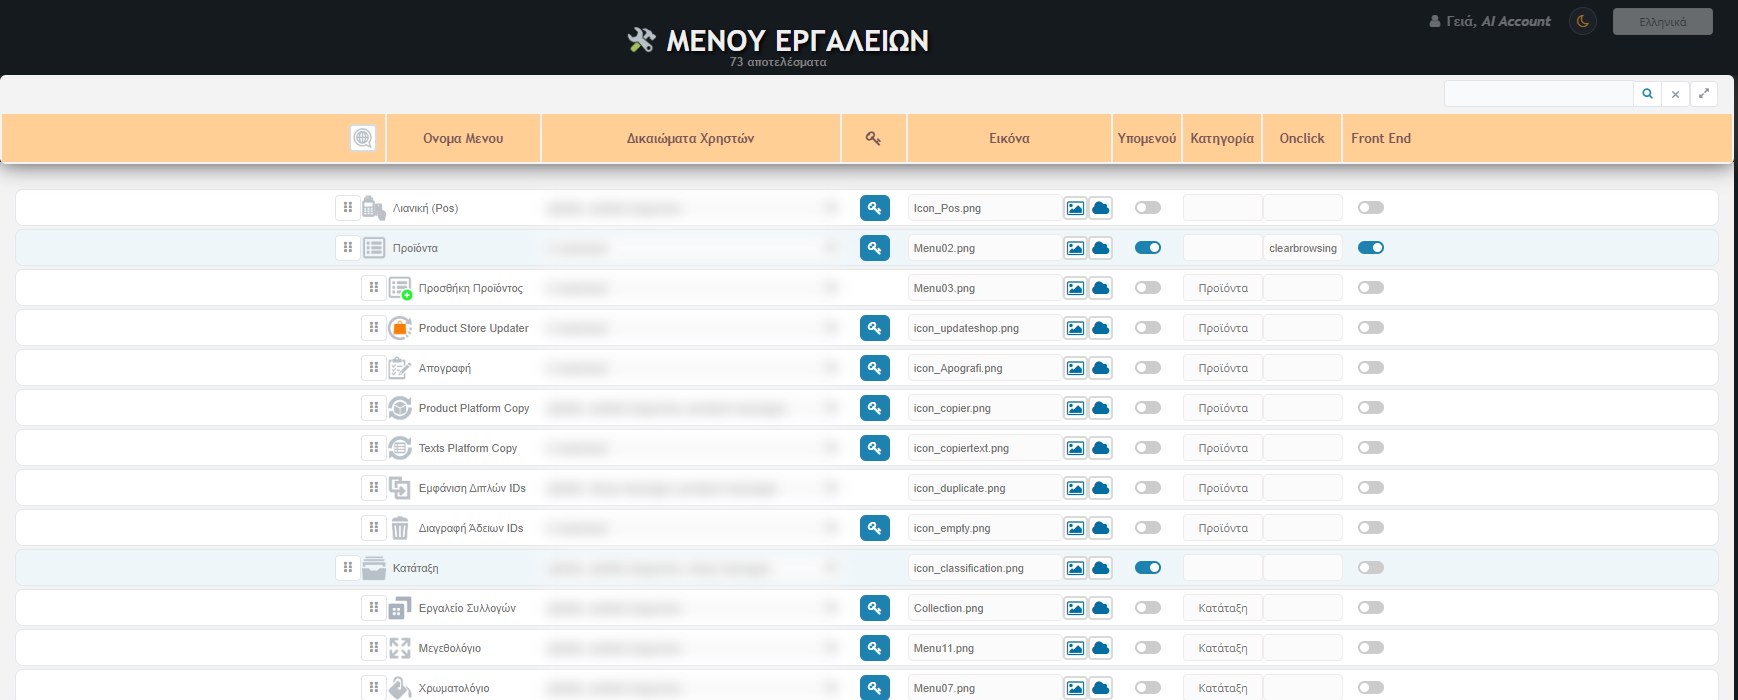
- Handle (⠿): you drag the row to change the tool’s order.
- Menu Name: the name the user sees, with its image, in Greek and English (the globe in the header switches the language).
- User Permissions: which roles see the tool. It is defined per eShop. The key button opens the tool’s per-action permissions, i.e. who can save, delete, print etc.
- Image: the tool’s icon. The button with the photo chooses from the ready ones and the cloud uploads your own.
- Submenu: the switch defines whether the row is a main tool or a submenu of another. In Category it is written which main tool it belongs to (e.g. Products, Classification).
- Onclick: an optional action performed on click (e.g. the Displayer opens in a new window).
- Front End: the switch also shows the tool in the eShop menu (not only in the management). The links can be internal (e.g.
/whatever) or external (http://...).
You can hide a tool you don’t use or rearrange the order to fit the way your business works. The Tool Menu page and the Platform Setup are never hidden, so you don’t lose access to the setting.
Modules
The Modules are optional pieces that connect the platform with external services. Today the page has the installation of Single Sign-On (SSO), i.e. users logging in with an account from another service.
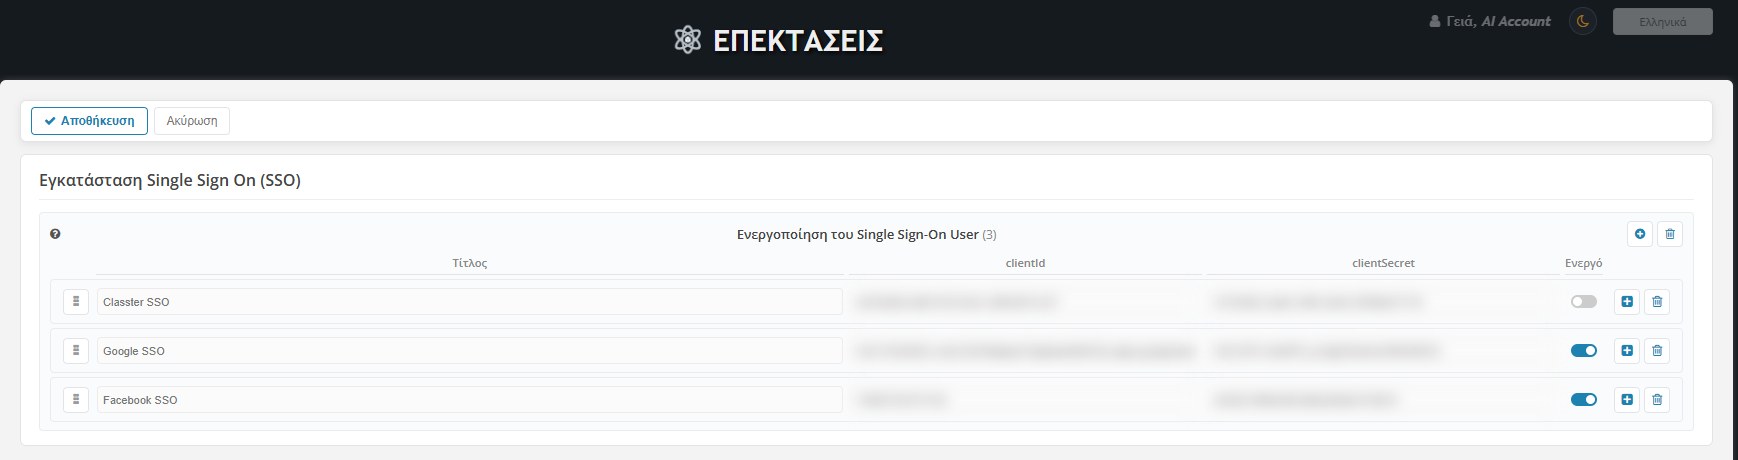
- Each row is a service: Classter SSO, Google SSO, Facebook SSO.
- clientId and clientSecret: the details the service gives you when you register your application there. They are passwords, so you don’t share them with anyone.
- Active: the switch turns the service on or off. When it is active, the corresponding button appears on the eShop’s login page.
- With the + and bin buttons you add or remove rows, and with the handle you change the order.
- Save saves the changes and Cancel leaves them.
The modules that work in each eShop are defined centrally by the platform provider. If you need one that doesn’t appear, ask for it from there.
Dropdown Lists
The Dropdown Lists are the choice lists that appear across the platform (in drop-down menus and fields). Instead of being hidden in the code, you change them from here.
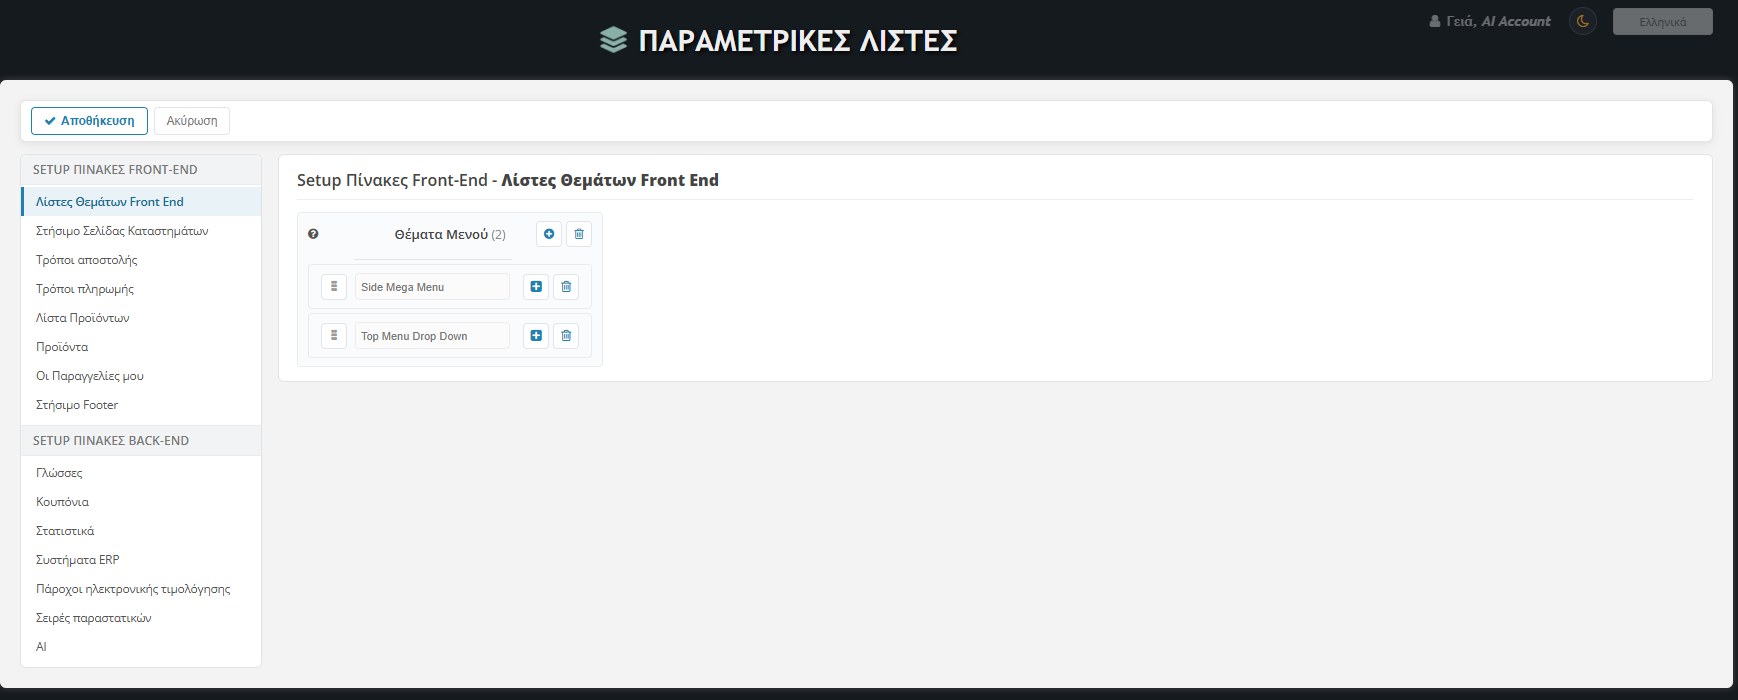
On the left the lists are grouped into two parts:
- Front-End setup tables: Front End Theme Lists (e.g. Side Mega Menu, Top Menu Drop Down), Stores page setup, Shipping methods, Payment methods, Product list, Products, My orders and Footer Setup.
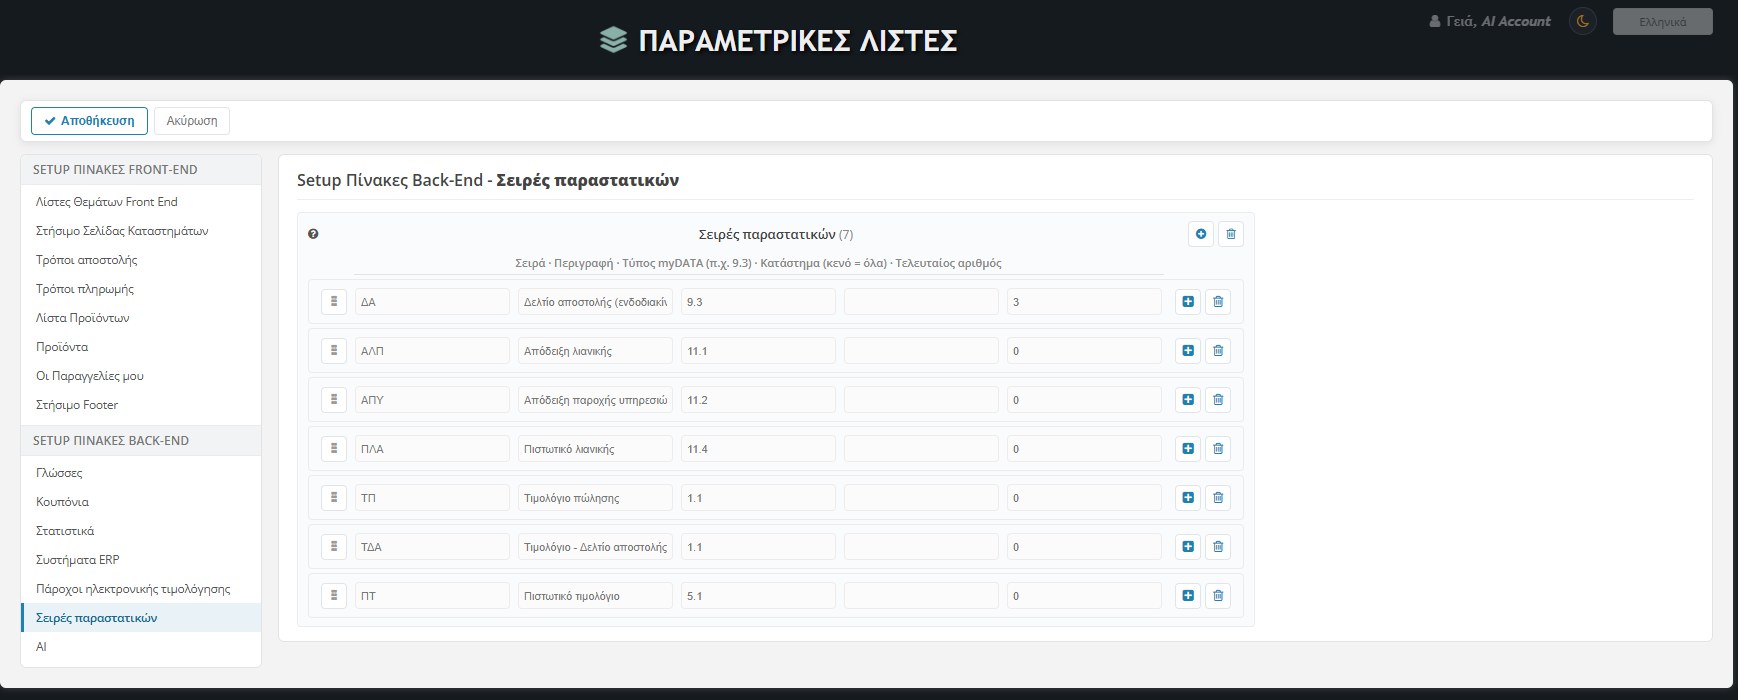
- Back-End setup tables: Languages, Coupons, Statistics, ERP Systems, E-invoicing providers, Document series and AI.
Click a list to see it and change its rows:
- With the + in the header you add a row, with the bin you clear the list, and in each row the + and the bin add or remove one row.
- The handle changes the order by dragging.
- The question mark next to the title explains what the list does.
- Save below the title so the changes stay.
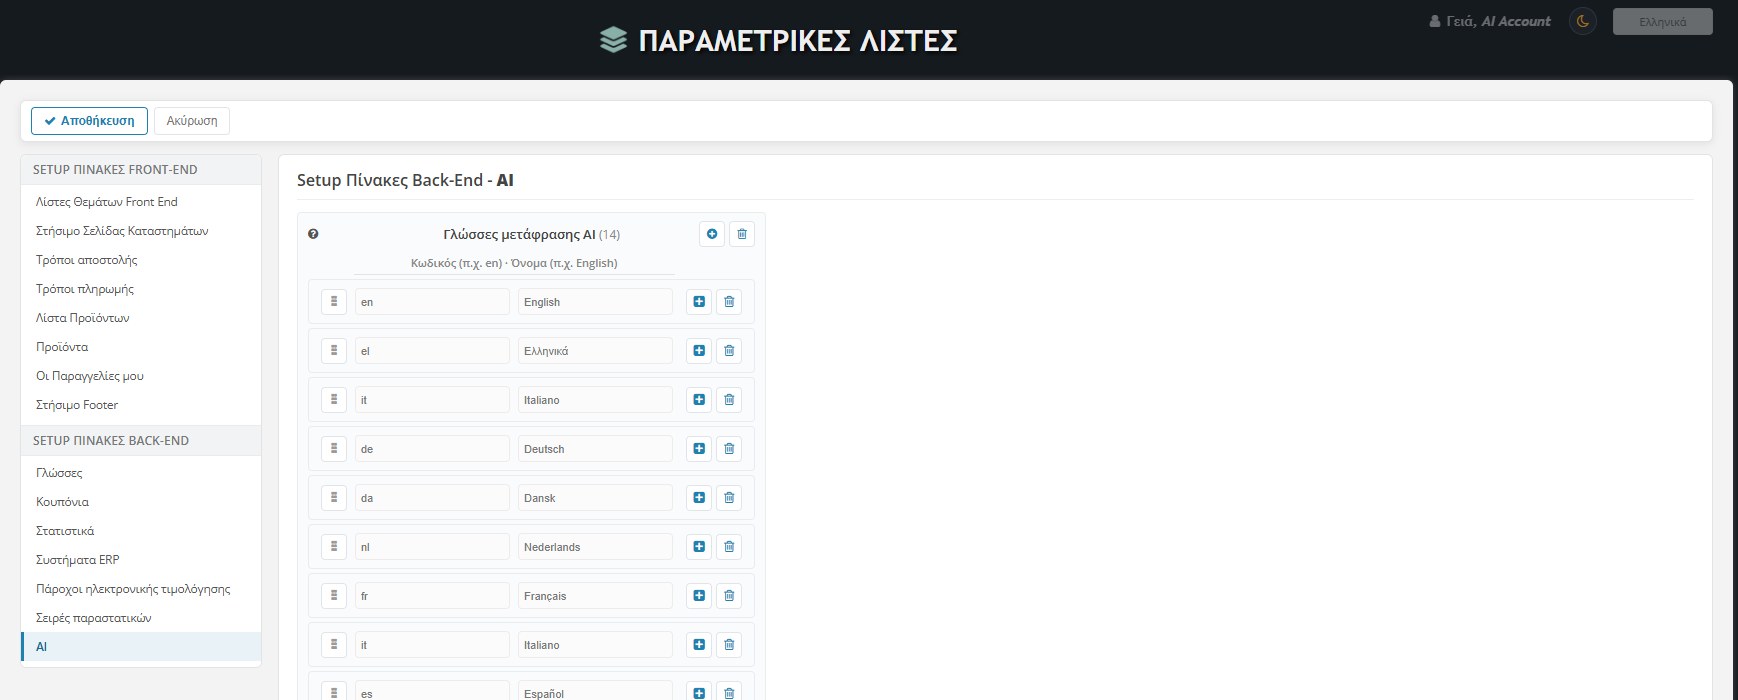
en) and a name (e.g. English).Two lists deserve special attention:
- AI: the AI translation languages. Add a language and it will appear in the Translator and in the AI translations of products.
- Document series: each series has a series (e.g. ΔΑ), a description (e.g. Delivery note), a myDATA type (e.g. 9.3), a store (empty means all) and a last number. The POS uses them when issuing documents and delivery notes (see Internal Handling).
Platform Setup
The Platform Setup is the large page with the eShop’s general parameters. It is available only to the administrator (admin) and that is why there is no screenshot here. It is divided into sections, each with its own title, and you save them all together:
- Business Details: company name and details that appear on documents and printouts.
- General eShop Parameters: the store’s basic operating switches.
- General material and website setup and Store Theme Editing: images, colours and appearance of the eShop.
- Online Store Texts: the page texts (e.g. the announcement above the store).
- Physical Stores and branches: the business’s stores and warehouses. From here come the “storage locations” of the Displayer.
- Main Product Categories, Priority Order and Discounts.
- Platform Management Emails: which address the platform’s notifications reach.
- Coupon Settings and Review Sending Settings (with the interval for sending the emails).
- Analytics eShop and Social Media.
- AI Settings: here the AI tools are activated. There are two fields, ChatGPT and Claude, each with its own API key and activation switch. One or the other turns on (when you turn on one, the other turns off). Without an active connection the AI buttons do not appear anywhere in the platform. The API key is a password, so you don’t share it.
- Bank Details and Credit Cards: the eShop’s payment details.
- Shipping countries.
- ERP Synchronisation: connection to the business’s ERP (see also the “ERP Systems” list).
- POS Settings and Document issuing: the details of the register and of e-invoicing. They appear when the POS is active.
- Embedding extra HTML5 / CSS / JavaScript code in the eShop’s Front-End.
Caution: on this page there are passwords and API keys. Don’t share them, not even in screenshots.